If you are a developer, there is at least one time on your dev journey that you did come across some beautiful codeblock with nice custom theme color, showing proper line, color syntax, showing name file type,... And you also want to make the same thing. In this post, I will show you everything I know about how to make a custom digital blog by MDX.
Prerequisites
You have to be somewhat familiar with NextJS. If you have not tried NextJS before, I highly recommend you to follow NextJS tutorial from their official website (since they explained everything quite clearly and help you create a small website with it).
About styling, I'm using ChakraUI to style my website but I will not recommend you to follow the same strategy. Instead, I suggest you to use CSS framework (or even pure CSS) that you are good at currently. I will try as much as I can to explain what the property of each ChakraUI component so you can apply same idea.
About MDX, I highly recommend you to follow checkout their Getting started page , there may be many integrations process with other framework that you have not heard of, but let just focus on their NextJS section for now. Then reading the page Using MDX to have some ideas how they use MDX, you could go ahead and try out MDX with NextJS first since you already have some idea how to generation page in NextJS from section 1.
If something goes wrong, please refer to this repo for more information or you could make an issue in my main website repo for more clarification so I can improve the content.
Installation and Configuration
There are some packages that you will need you to install before hand. I will explain what is the purpose for each of them:
- mdx-js/loader . This is webpack version of MDX that help
you to load MDX (you can imagine it is like a compiler to translate MDX to HTML structure). If your intention is to
use MDX directly in the
pagedirectory of NextJS, you have to install this package since this is the requirement for MDX. There is other option which I am currently using is that I totally separate the contents out of thepagefolder and usingnext-mdx-remote(which I will introduce below) to fetch the content forgetStaticProps. Config yournext.config.js(If you just want to put the contents in thepagefolder for nextjs to automatically render them):
1module.exports = {2 reactStrictMode: true,34 // Prefer loading of ES Modules over CommonJS5 experimental: { esmExternals: true },6 // Support MDX files as pages:7 pageExtensions: ['md', 'mdx', 'tsx', 'ts', 'jsx', 'js'],8 // Support loading `.md`, `.mdx`:9 webpack(config, options) {10 config.module.rules.push({11 test: /\.mdx?$/,12 use: [13 // The default `babel-loader` used by Next:14 options.defaultLoaders.babel,15 {16 loader: '@mdx-js/loader',17 /** @type {import('@mdx-js/loader').Options} */18 options: {19 /* jsxImportSource: …, otherOptions… */20 },21 },22 ],23 });2425 return config;26 },27};
- date-fns . This is totally optional, you do not need to install this since it is just a tool to format the date for meta-data.
- gray-matter . This is also optional, it is similar to YAML key/value that help you to have some extra data (meta-data) in your mdx. Example (the highlight parts is meta-data):
1author: Van Nguyen Nguyen2date: "2022-02-05"3summary: "Something"45---67Your content go here
next-mdx-remote . If you do not want to use
mdx-js/loaderand want the fetching content outside, this is a requirement since this package will allow your MDX to be loaded within getStaticProps or getServerSideProps (you should know these things by now) from NextJS. There is are some alternative for this: mdx-bundler and the one from NextJS themself next-mdx . I will point out the pros and cons of them later.prism-react-renderer . This is the package that help you to custom your codeblock. This a recommendation because there are mutiple package out there to do the same things. I will explain the logic later.
mdx-js/react . This package will provide the
MDXProviderfor you to pass the custom components
Create custom tags for the page
Set up fundamental logic for rendering MDX
First, we need some content for the website. I highly recommend you to use web tutorial project from NextJS that you already finished beforehand. Then we can create a folder with a MDX file at the root level:
try-mdx/test.mdx
1---2title: "This is for Trying MDX"3date: "2020-01-02"4summary: "This is the summary testing for MDX"5---67# Ahihi this is a custome Heading89<Test>10 <Something>Hello World </Something>11</Test>1213a [link](https://example.com), an , some *emphasis*,14something **strong**, and finally a little `<div/>`.15**strong**1617```javascript file=testing.js highlights=1,218const test= 1;19const funnyThing = () => {20 console.log(test);21}22funnyThing()```
Now, we need to find the way to fetch the content of the MDX file. If you already completed
the NextJS tutorial, you know that you can get the path and the content by applying the some logic
but instead of getting file with .md, you will get the file with .mdx
lib/posts.js
1import fs from 'fs';2import path from 'path';3// Using gray matter for getting metadata4import matter from 'gray-matter';56const postsDirectory = path.join(process.cwd(), '/try-mdx');78export function getSortedPostsData() {9 // Get file names under /posts10 const fileNames = fs.readdirSync(postsDirectory);11 const allPostsData = fileNames.map(fileName => {12 const ext = fileName.split('.')[1];13 // Remove ".mdx" from file name to get id14 const id = fileName.replace(/\.mdx$/, '');1516 // Read markdown file as string17 const fullPath = path.join(postsDirectory, fileName);18 const fileContents = fs.readFileSync(fullPath, 'utf8');1920 // Use gray-matter to parse the post metadata section21 const matterResult = matter(fileContents);22 // Combine the data with the id23 return {24 id,25 ...matterResult.data,26 };27 });28 // Sort posts by date29 return allPostsData.sort(({ date: a }, { date: b }) => {30 if (a < b) {31 return 1;32 } else if (a > b) {33 return -1;34 } else {35 return 0;36 }37 });38}3940export function getAllPostIds() {41 // Read all the filename in the directory path42 const fileNames = fs.readdirSync(postsDirectory);4344 // Filter out the ext, only need to get the name of the file45 return fileNames.map(fileName => { return {46 // Following routing rule of NextJS47 params: {48 id: fileName.replace(/\.mdx$/, ''),49 },50 };51 });52}5354export async function getPostData(id) {55 // For each file name provided, we gonna file the path of the file56 const fullPath = path.join(postsDirectory, `${id}.mdx`);57 // Read the content in utf8 format58 const fileContents = fs.readFileSync(fullPath, 'utf8');5960 // Using gray-matter to get the content and that data61 const { content, data } = matter(fileContents);6263 // provide what need to be rendered for static-file-generation64 return {65 id,66 content,67 ...data,68 };69}
From now, I assume that you understand about Static Generation as
well as Dynamic Routing (since these are fundamental topics that got covered
in NextJS tutorial course) like how to use getStaticPaths and getStaticProps.
If you follow the
mdx-js/loaderapproach, you can just create some[filename].mdxand see the magic happens, the content you write in the MDX file will be translated into HTML format. Do not forget the config yournext.config.jsand installmdx-js/loader
If you follow the next-md-remote, you have to separate your blog contents out of the page/
folder so NextJS will not render it. Then using dynamic route to fetch them.
1pages/2...3├── posts4│ └── [id].js // Dynamic Routing5...
Inside [id].js file:
pages/posts/[id].js
1// Getting component from NextJS tutorial2// Layout is just the wrapper with the styling width to move page to the center with3// some extra metadata4import Layout from '../../components/layout';5// Head component is add the title for the page6import Head from 'next/head';7// Date component from NextJS tutorial, basically it will format the date for you8// but you could just print a raw date string9import Date from '../../components/date';1011// Function to get path and contents of the .mdx file (already mentioned above)12import { getAllPostIds, getPostData } from '../../lib/posts';1314// This is just come basic class for styling some tags15import utilStyles from '../../components/utils.module.css';1617// Two important function from next-mdx-remote that make the magic happens18// serialize will help us to convert raw MDX file into object that will be passed19to MDXRemote for rendering HTML on the page20import { serialize } from 'next-mdx-remote/serialize';21// MDXRemote is the component for rendering data that get from serialize22import { MDXRemote } from 'next-mdx-remote';2324export async function getStaticPaths() {2526 // Get all the unique path that we need( the name of the folder)27 const paths = getAllPostIds();28 return {29 // Return the path30 paths,31 fallback: false,32 };33}3435export async function getStaticProps({ params }) {36 // Get the raw data of the MDX file according to the path that we get37 // Including the metadata and the raw content38 const postData = await getPostData(params.id);3940 // Translating the raw content into readable object by serialize41 // I recommend you to console.log the value to see how they look like42 const mdxSource = await serialize(postData.content, {43 // next-mdx-remote also allow us to use remark and rehype plugin, reading MDX docs for more information44 // I am currently not using any plugin, so the array will be empty.45 mdxOptions: {46 remarkPlugins: [],47 rehypePlugins: [],48 },49 });50 return {51 // we only need 2 things from the props52 // postData (we dont care about the content since that one we will get from the mdxSource)53 // We care about getting the metadata here so that is why we still need to get postData54 props: {55 postData,56 mdxSource,57 },58 };59}6061export default function Post({ postData, mdxSource }) {62 return (63 <Layout>64 <Head>65 <title>{postData.title}</title>66 </Head>67 <article>68 <h1 className={utilStyles.headingXl}>{postData.title}</h1>69 <div className={utilStyles.lightText}>70 <Date dateString={postData.date} />71 </div>72 // MDXRemote is the components to render the actual content, other components above is just for73 // metadata74 <MDXRemote {...mdxSource} />75 </article>76 </Layout>77 );78}
You may want to ask "hmm, why I have to use next-remote-mdx to set up everything like this?, instead I could
just use mdx-js/loader and let NextJS render my page automatically". Well, I choose to go this way
because I want to easily add more customization on the my page like having more components in my <Post/>. "But hey,
hasn't MDX allowed you to import new components already?". Yes, but controlling through JSX is always easier and better
.For example, you can have some logic right in the <Post/> component which is annoying to do in MDX.
Your page will probably look like this.

Styling your tags
MDX Docs actually show you the way to style your components through
MDXProvider that come from mdx-js/react or other web framework as well. Let apply it to our NextJS app.
NextJS allow you to custom App , what does it benefit you for this case:
- Inject additional data into pages (which allows us to wrap every new component and import new data, and these thing will got added to the whole website across multiple page).
- Persisting layout between page change (which means you can wrap the whole app by custom component these new component will be applied globally).
- Add global CSS (which allow you to apply the color theme for your code block).
Create a customHeading.js in your components folder
1components/2├── customHeading.js3├── ...
Inside customHeading.js
components/customHeading.js
1//This is custom h1 tag = '#'2const MyH1 = props => <h1 style={{ color: 'tomato' }} {...props} />;34//This is custom h2 tag = '##'5const MyH2 = props => <h2 style={{ color: 'yellow' }} {...props} />;678//This is custom link tag = '[<name>](<url>)'9const MyLink = props => {10 console.log(props); // Will comeback to this line11 let content = props.children;12 let href = props.href;13 return (14 <a style={{ color: 'blue' }} href={href}>15 {content}16 </a>17 );18};1920const BoringComponent = () => {21 return <p>I am so bored</p>22}2324export { MyH1, MyH2, MyLink, BoringComponent };
Look at the code, you wonder "Okay, but what is the variable props there?". I will explain the idea later.
Now let get the custom components work first.
Create a _app.js in your page folder or if you already had one, you do not need to create new
one anymore
1pages/2...3├── _app.js4...
Inside _app.js
pages/_app.js
1// You do not need to worry about these things2// it just give you some extra global style for the page3import '../styles/global.css';4import '../src/theme/style.css';5import { ChakraProvider } from '@chakra-ui/react';6import theme from '../src/theme/test';78// These are important line9import { MyH1, MyH2, MyLink, BoringComponent } from '../components/CustomHeading';10import { MDXProvider } from '@mdx-js/react';1112// MDXProvider accept object only13const components = { h1: MyH1, h2: MyH2, a: MyLink, BoringComponent };1415export default function App({ Component, pageProps }) {16 return (17 // Do not worry about the <ChakraProvider/>, it just give you the global style18 <ChakraProvider theme={theme}>19 // Wrapping the <Component/> by <MDXProvider/> so everypage will get applied20 //the same thing21 <MDXProvider components={components}>22 // <Component/> is the feature of NextJS which identify the content of your23 // current page. <Component/> will change its pageProps to new page when you change to new24 // page25 <Component {...pageProps} />;26 </MDXProvider>27 </ChakraProvider>28 );29}
Now you can see that the heading will turn into red because we are using h1 if you are familiar
with markdown and the link will turn into blue.
Now let go back to the props variable before. If you scroll up, you can see I did console.log(props).
Let see what it is from the console
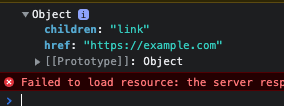
If you know about ReactJS (I assume you did), if you pass any key value to a component, you can get
it value through props. So MDX under the hood already parse the whole file to know which one
is a link, image, heading, codeblock,... So you can get the value from there.
To this point, you know how MDX interact with its custom components by just getting information from the props and passed it into the new custom components you can skip next explanation.
Simple explain MDXProvider
1import Random from 'somewhere'23# Heading45<Random/>67I feel bored
This is what we get when MDX translate the file into JSX
1import React from 'react'2import { MDXTag } from '@mdx-js/tag'3import MyComponent from './my-component'45export default ({ components }) => (6 <MDXTag name="wrapper" components={components}>7 <MDXTag name="h1" components={components}>8 Heading9 </MDXTag>10 <Random />11 <MDXTag name="p" components={components}>12 I feel bored13 </MDXTag>14 </MDXTag>15)
We see that the exports default take a components from props. The name props of
MDXTag will maps to a component defined in the components props. That why when we
construct our components variable, we have to specify which tag this component mapping to.
Or if you dont want to map anything but simply just for using it in MDX file, we do not need
to specify any name tag.
Styling your codeblock
This is probably the one that most people are waiting for. Let's walk through it together.
Choosing your syntax highlight theme is quite important since it will make your codeblock more
readable. I personally using my favorite theme GruvBox Dark .
Or you can find more beautiful themes through this repo .
My approach for this is that I will apply this syntax highlight theme globally, I do not want to change dynamically and I know the purpose of my website is just a small blog so there's no need to using multiple syntax highlighting colors.
First put the code highlighting css somewhere. I recommend create a folder styles/ in the root
1styles/2└── gruvBox.css3...
Go to your _app.js and add the styling
pages/_app.js
1import '../styles/global.css';2import '../src/theme/style.css';3import { ChakraProvider } from '@chakra-ui/react';4import theme from '../src/theme/test';56import { MyH1, MyH2, MyLink, BoringComponent } from '../components/CustomHeading';7import { MDXProvider } from '@mdx-js/react';89// When you put the styling in _app.js the style will be applied across the whole website10import '../styles/gruvBox.css';1112const components = { h1: MyH1, h2: MyH2, a: MyLink, BoringComponent };1314export default function App({ Component, pageProps }) {15 return (16 <ChakraProvider theme={theme}>17 <MDXProvider components={components}>18 <Component {...pageProps} />;19 </MDXProvider>20 </ChakraProvider>21 );22}
Wow, colour changed!! Actually not quite, if you check your page right now, the color would be really weird. Let
me explain why. Firstly, this is what you get from the HTML structure on your page (you can just inspect from your
own browser to check for the markup and styling). Just a whole string of code got cover by <code/> tag
1<pre><code class="language-javascript" metastring="file=testing.js highlights=1,3-9" file="testing.js" highlights="1,3-9">2"const ahihi = 1;3export async function getStaticProps({ params }) {4 const postData = await getPostData(params.id);5 const mdxSource = await serialize(postData.content);6 console.log(postData);7 console.log(mdxSource);8 return {9 props: {10 postData,11 mdxSource,12 },13 };14}"15</code></pre>
And this is the only styling that got applied to that markup above
1code[class*="language-"], pre[class*="language-"] {2 color: #ebdbb2;3 font-family: Consolas, Monaco, "Andale Mono", monospace;4 direction: ltr;5 text-align: left;6 white-space: pre;7 word-spacing: normal;8 word-break: normal;9 line-height: 1.5;10 -moz-tab-size: 4;11 -o-tab-size: 4;12 tab-size: 4;13 -webkit-hyphens: none;14 -ms-hyphens: none;15 hyphens: none;16}
But if you check your favorite syntax styling sheet, we have a lot of different things like: token,
comment, delimiter, operator,... So where does all these things come from? Well they are
from the tokenize process for code. So you have to find some way to tokenize that string so
you will be able to apply those styling. prism-react-renderer
is going to be a great tool for this.
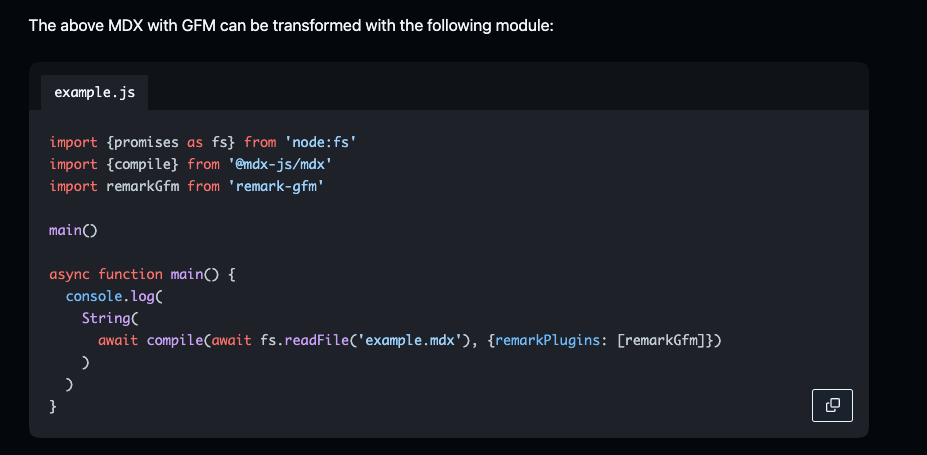
If you go to their usage example, you can clearly see how we are going to use it. Since they already provided a wrapper example for us, we just need to pass our content data.
Create a customCodeblock.js in your components/ folder
components/customCodeblock.js
1// I'm using styled components here since they also recommend using it but you can2// just create some custom class or applied style directly into the components like the3// React way.4import styled from '@emotion/styled';5// This is their provided components6import Highlight, { defaultProps } from 'prism-react-renderer';78// Custom <pre/> tag9const Pre = styled.pre`10 text-align: left;11 margin: 1em 0;12 padding: 0.5em;13 overflow: scroll;14 font-size: 14px;15`;1617// Cutom <div/> (this is arrangement of the line)18const Line = styled.div`19 display: table-row;20`;2122// Custom <span/> (this is for the Line number)23const LineNo = styled.span`24 display: table-cell;25 text-align: right;26 padding-right: 1em;27 user-select: none;28 opacity: 0.5;29`;3031// Custom <span/> (this is for the content of the line)32const LineContent = styled.span`33 display: table-cell;34`;353637const CustomCode = props => {38 // Pay attention the console.log() when we applied this custom codeBlock into the39 //_app.js. what metadata you are getting, is there anything you did not expect that actually40 // appear. Can you try out some extra features by changing the MDX codeblock content41 console.log(props);4243 // From the console.log() you will be able to guess what are these things.44 const className = props.children.props.className || '';45 const code = props.children.props.children.trim();46 const language = className.replace(/language-/, '');4748 return (49 <Highlight50 {...defaultProps}51 theme={undefined}52 code={code}53 language={language}54 >55 {({ className, style, tokens, getLineProps, getTokenProps }) => (56 <Pre className={className} style={style}>57 {tokens.map((line, i) => (58 <Line key={i} {...getLineProps({ line, key: i })}>59 <LineNo>{i + 1}</LineNo>60 <LineContent>61 {line.map((token, key) => (62 <span key={key} {...getTokenProps({ token, key })} />63 ))}64 </LineContent>65 </Line>66 ))}67 </Pre>68 )}69 </Highlight>70 );71};7273export default CustomCode;
Let apply this this CustomCode into your MDXProvider
pages/_app.js
1import '../styles/global.css';2import { ChakraProvider } from '@chakra-ui/react';3import theme from '../src/theme/test';4import '../src/theme/style.css';5import { MyH1, MyH2, MyLink } from '../components/CustomHeading';6import { MDXProvider } from '@mdx-js/react';7import CustomCode from '../components/customCode';8import '../styles/gruvBox.css';910const components = {11 h1: MyH1,12 h2: MyH2,13 a: MyLink,14 pre: CustomCode };1516export default function App({ Component, pageProps }) {17 return (18 <ChakraProvider theme={theme}>19 <MDXProvider components={components}>20 <Component {...pageProps} />;21 </MDXProvider>22 </ChakraProvider>23 );24}
I hope you get what you want, the color should be as what you are expecting. If there something wrong, please refer to this repo
prism-react-rendereractually provide you color theme, they did show you how to apply it in their docs, but they dont have GruvBox that why I have to find the GruvBox style for global style to override their default color. If you are able to find your favorite theme in their list, there is no need to add global style, you can remove it.
Create file name for you codeblock
I hope that you did check the console.log(props) from the your custom codeblock. This is
what we see on in the console:
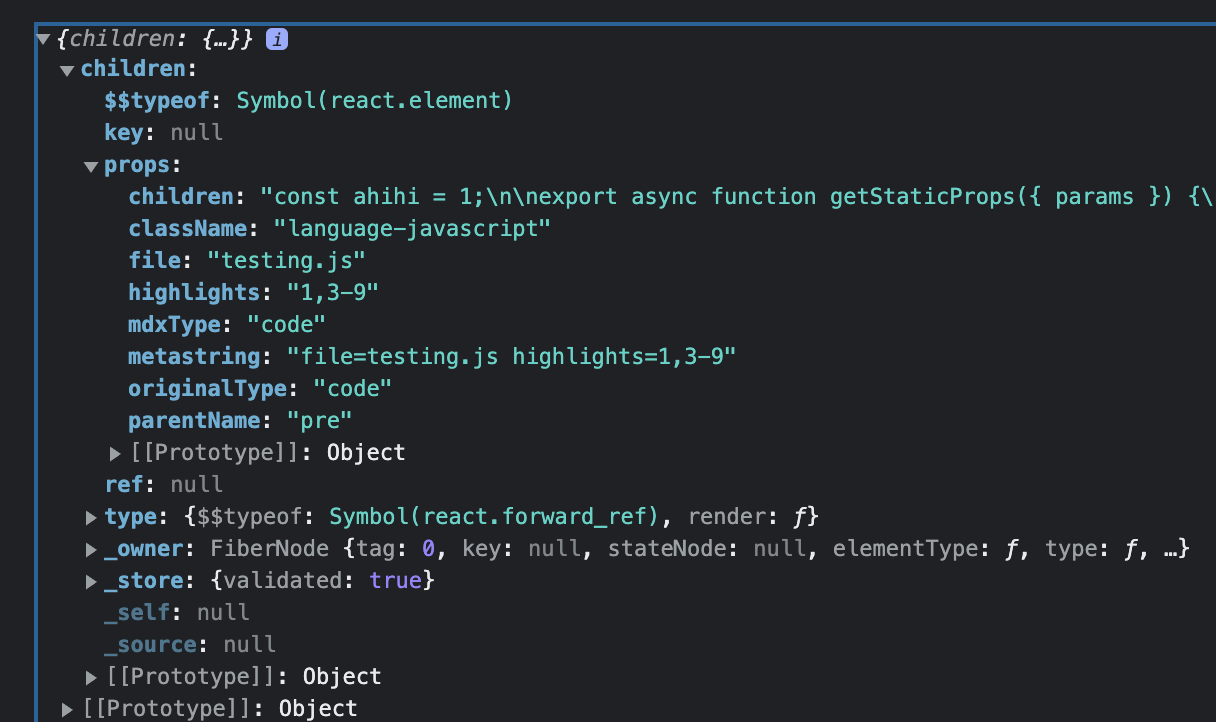
There is some interesting props here: file, highlights, metastring. If you comeback to the content
that I already gave in the beginning, there are some extra key value I put in the codeblock which for a usual
markdown syntax, it is kind of useless. But this is MDX, MDX actually parses the codeblock and give us some metadata.
From this data, we will be able to make some extra features. Let add the file name/path for it:
components/customCodeblock.js
1import styled from '@emotion/styled';2import Highlight, { defaultProps } from 'prism-react-renderer';34const Pre = styled.pre`5...6`;78const Line = styled.div`9...10`;1112const LineNo = styled.span`13...14`;1516const LineContent = styled.span`17...18`;1920const CustomCode = props => {21 console.log(props);22 const className = props.children.props.className || '';23 const code = props.children.props.children.trim();24 const language = className.replace(/language-/, '');25 const file = props.children.props.file;2627 return (28 <Highlight29 {...defaultProps}30 theme={undefined}31 code={code}32 language={language}33 >34 {({ className, style, tokens, getLineProps, getTokenProps }) => (35 <>36 <h2>{file}</h2>37 <Pre className={className} style={style}>38 {tokens.map((line, i) => (39 <Line key={i} {...getLineProps({ line, key: i })}>40 <LineNo>{i + 1}</LineNo>41 <LineContent>42 {line.map((token, key) => (43 <span key={key} {...getTokenProps({ token, key })} />44 ))}45 </LineContent>46 </Line>47 ))}48 </Pre>49 </>50 )}51 </Highlight>52 );53};5455export default CustomCode;
Your homework is styling that file name for your code block.
Create highlights for you codeblock
Now, if you look at the highlights metadata, you probably wonder what I am
trying to accomplish here. My idea is simple:
1if my highlights = 1,3-52I want the value I parse from this string to be like this [1, 3, 4, 5]34if my highlights = 1,2,3 or 1-35I want the value I parse from this string to be like this [1, 2, 3]67You get it right? the '-' will detect the range that I want to loop through.
Since we are able to get the highlights value now, we need to find the way to parse this string
Let create lib/parseRange.js
lib/parseRange.js
1function parsePart(string) {2 // Array that contain the range result3 let res = [];45 // we split the ',' and looping through every elemenet6 for (let str of string.split(',').map(str => str.trim())) {7 // Using regex to detect whether it is a number or a range8 if (/^-?\d+$/.test(str)) {9 res.push(parseInt(str, 10));10 } else {11 // If it is a range, we have to contruct that range12 let split = str.split('-');13 let start = split[0] - '0';14 let end = split[1] - '0';15 for (let i = start; i <= end; i++) {16 res.push(i);17 }18 }19 }20 return res;21}2223export default parsePart;
Let use this thing your customCodeblock.js:
components/customCodeblock.js
1import styled from '@emotion/styled';2import Highlight, { defaultProps } from 'prism-react-renderer';3// import your function4import parsePart from '../lib/parseRange';56const Pre = styled.pre`7...8`;910const Line = styled.div`11...12`;1314const LineNo = styled.span`15...16`;1718const LineContent = styled.span`19...20`;2122// shouldHighlight will return a function to be called later23// that function will return true or false depend on whether the index will appear24// inside our parsed array25const shouldHighlight = raw => {26 const parsedRange = parsePart(raw);27 if (parsedRange) {28 return index => parsedRange.includes(index);29 } else {30 return () => false;31 }32};3334const CustomCode = props => {35 console.log(props);36 const className = props.children.props.className || '';37 const code = props.children.props.children.trim();38 const language = className.replace(/language-/, '');39 const file = props.children.props.file;4041 // Getting the raw range42 const rawRange = props.children.props.highlights || '';43 // assign the checking function44 const highlights = shouldHighlight(rawRange);4546 return (47 <Highlight48 {...defaultProps}49 theme={undefined}50 code={code}51 language={language}52 >53 {({ className, style, tokens, getLineProps, getTokenProps }) => (54 <>55 <h2>{file}</h2>56 <Pre className={className} style={style}>57 // Getting the index from the mapping line58 {tokens.map((line, i) => (59 <Line key={i} {...getLineProps({ line, key: i })}>60 <LineNo>{i + 1}</LineNo>61 <LineContent62 style={{63 background: highlights(i + 1) ? 'gray' : 'transparent',64 }}65 >66 {line.map((token, key) => (67 <span key={key} {...getTokenProps({ token, key })} />68 ))}69 </LineContent>70 </Line>71 ))}72 </Pre>73 </>74 )}75 </Highlight>76 );77};7879export default CustomCode;
I hope you will get the highlight styling that you want. You now get the basic idea of how to highlight line. Making it look better will be your homework.
Making a copy functionality for your codeblock
We gonna utilize a web API called Clipboard API to accomplish this. I am not going to explain the mechanism since the main website does a way better job than me. You can check out their explainaion here
Let modify our customCodeblock.js
components/customCodeblock.js
1// useState to change the text of copy button2import { useState } from 'react';3import styled from '@emotion/styled';4import Highlight, { defaultProps } from 'prism-react-renderer';5import parsePart from '../lib/parseRange';67const Pre = styled.pre`8...9`;1011const Line = styled.div`12...13`;1415const LineNo = styled.span`16...17`;1819const LineContent = styled.span`20...21`;2223const shouldHighlight = raw => {24 ...25};2627const CustomCode = props => {2829 const [currLabel, setCurrLabel] = useState('Copy');3031 const copyToClibBoard = copyText => {32 let data = [33 new ClipboardItem({34 'text/plain': new Blob([copyText], { type: 'text/plain' }),35 }),36 ];37 navigator.clipboard.write(data).then(38 function () {39 setCurrLabel('Copied');40 setTimeout(() => {41 setCurrLabel('Copy');42 }, 1000);43 },44 function () {45 setCurrLabel(46 'There are errors'47 );48 }49 );50 };5152 const className = props.children.props.className || '';53 const code = props.children.props.children.trim();54 const language = className.replace(/language-/, '');55 const file = props.children.props.file;5657 const rawRange = props.children.props.highlights || '';58 const highlights = shouldHighlight(rawRange);5960 return (61 <Highlight62 {...defaultProps}63 theme={undefined}64 code={code}65 language={language}66 >67 {({ className, style, tokens, getLineProps, getTokenProps }) => (68 <>69 <h2>{file}</h2>70 <button71 onClick={() => copyToClibBoard(props.children.props.children)}72 >73 {currLabel}74 </button>75 <Pre className={className} style={style}>76 {tokens.map((line, i) => (77 <Line key={i} {...getLineProps({ line, key: i })}>78 <LineNo>{i + 1}</LineNo>79 <LineContent80 style={{81 background: highlights(i + 1) ? 'gray' : 'transparent',82 }}83 >84 {line.map((token, key) => (85 <span key={key} {...getTokenProps({ token, key })} />86 ))}87 </LineContent>88 </Line>89 ))}90 </Pre>91 </>92 )}93 </Highlight>94 );95};9697export default CustomCode;
Summary
I hope you achieve what you are looking for when you reading my post. This is just some basic logic to automate custom tag for your website. Create as much custom components as possible to fulfill your need, styling thing in your favorite color. And from now on you could just focus on your content. Good luck on your dev journey